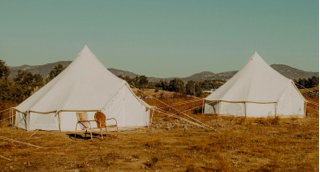
A waterproof canvas bell tent can be set-up for a couple of consecutive weeks without requiring much maintenance. But if you plan on keeping your bell tent up for several weeks/months then you will want to take precautions to make sure that it is well protected from standing and running water. One of the best ways to accomplish this is build a bell tent platform.

PROS & CONS OF A TENT DECK:
|
PROS |
CONS |
|
Your tent will last much longer (if pitched properly) |
Obviously more expensive. |
|
Allows water to escape, rather than puddle under tent. |
The deck itself will need to be maintained. |
|
Guy lines won't need to be re-tightened as much. |
Tent requires precision to set-up properly (especially at stress anchor points). |
|
Prevents mud dirtying side walls when it rains. |
Tent will experience less "give" during extreme weather. |
|
Discourages insects and animals from living under your tent. |
A bit more time consuming to put up and take down tent. |
|
Reduces tracking debris into tent. |
May require a permit. |
|
Oh, and it they look great! |
|
A tent platform keeps your tent off damp ground, speeding up the drying process of the canvas - discouraging the growth of mildew in locations where the sun has difficulties reaching. The platform also helps to encourage air circulation around the lower walls and the floor to help dry out damp canvas.
This insurance does come at an added cost, but it is well worth the extra time and investment.
SHOP LIFE INTENTS BELL TENTS
Selecting a Tent Platform Design
Platforms can be built in many shapes and sizes, and no one design is particularly more advantageous than another. The most popular shapes for a 16-foot (5-meter) bell tent platform are that of 20’x'20’ square, 20’x30’ rectangle, a hexagon, hendegon (11-gon), or dodegon (12-sided) - each with or without front decks for chairs.

The design decision for you will be determined based upon your desired function, form, and finances. The three main drivers behind the cost of a platform are: materials, labor and design.
-
The larger the platform, the higher the material cost.
-
Hiring a carpenter requires a higher cost vs. a DIY approach.
-
The more ellaborate your design, the more time it will take to build (see bullet #2).
You may also need to add footings to your platform if your site is not level, possibly even requiring the addition of a stairway to get to the front door.

Creating the Deck Design Plans
Once you have your design in mind, it's time to sketch out the plans. If one of your many skills isn't designing with CAD, then your contractor should be able to help render the blueprints for you. Once the plans on complete, you will know exactly how much lumber and hardware that will be required for your project.
Here at Life Intents we have developed some fairly extravagant bell tent plans that you could consider using for your deck. Our tent deck plans are shaped perfectly to the design of a 5-meter (16-foot) and/or a 6-meter (19-foot) bell tent and include a porch off the front door for an awning, stairs, and strong footings. We’re happy to share these for free with by signing up for your newsletter.

Tent Deck Material Considerations
Your platform will be exposed to extreme weather conditions that will vary by your location. Sun, rain, snow, and humidity can each erode the condition of your platform over time. It is recommended to use treated lumber and fasteners that are fabricated to withstand changing weather conditions.
Cedar and redwood are two of the better wood choices for bell tent decks, followed by the more economical option of pressure treated wood.

Anticipated Costs
Depending on the size of your platform, quality of the wood, and your location, you can expect that materials could cost between $1,500 - $3,500 (depending on what the current market is demanding). Labor will also be variable depending on several factors, but this could range between $1,500-$3,500.
Securing Your Tent Properly
Setting up your tent on the platform generally follows the same process as when putting it up directly on the ground. However, you will want to strategically decide how you will secure the guy lines and the floor of the tent directly to the platform itself.
SECURING THE FLOOR:
Once you place your tent on the platform, your next step will be to securely fasten the floor to the deck at each of the corners – making sure that the floor is tight and free of wrinkles. Instead of using tent ground stakes, you will want to use a bolt or screw to anchor each corner of the tent. To ensure that each corner does not slip over the screw or bolt, we would recommend using a washer to hold down the D-ring of each corner of the groundsheet. Another option is to consider a heavy-duty screw hook.
Note that once the tent is up, you may need to reposition some of the floor fasteners after the poles and guy lines are secured to relive any excessive or inadequate tension on the groundsheet.
SECURING THE GUY LINE ROPES:

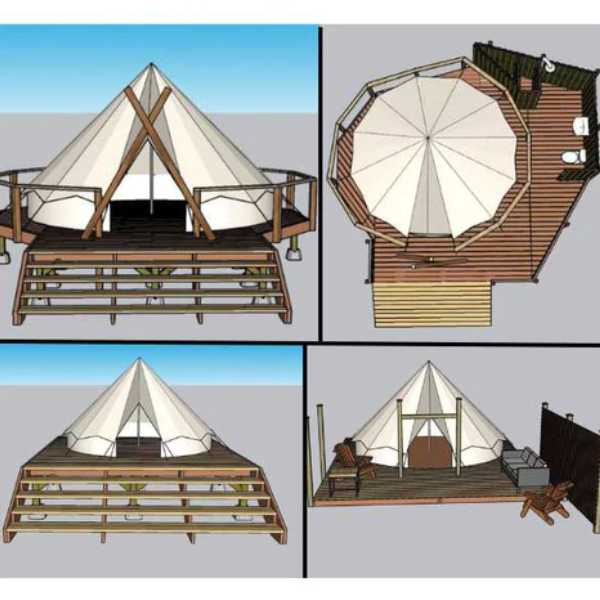
Approximate suggested deck pole location for guy lines
Having a plan to properly secure your guy lines is very important to help maintain the integrity and functionality of your bell tent. We have seen people simply extend their guy lines from the tent and secure them directly into the ground just off of the platform. We caution against taking this approach.
Bell tent guy lines are designed to be extended at a very specific angle off of the roof seams when they are set-up on solid ground. The added elevation created with a platform can create unnatural extension of the guy lines, which then may create incorrect pressure on the seams and poles, which could result in tent seams of your tent ripping in wind storms.

We suggest tying off the guy lines to posts added to the deck (or just off the deck). These posts can be 1-2 feet from the wall of the tent, standing about 2-3 feet tall. This will allow you to extend the guy lines at their intended angle, and also eliminates a potential tripping hazard.
If you plan on using a fly over your tent (which we always suggest), then you will want these posts to be a little taller since the fly cover guy lines will be secured a few inches above the tents' rope.
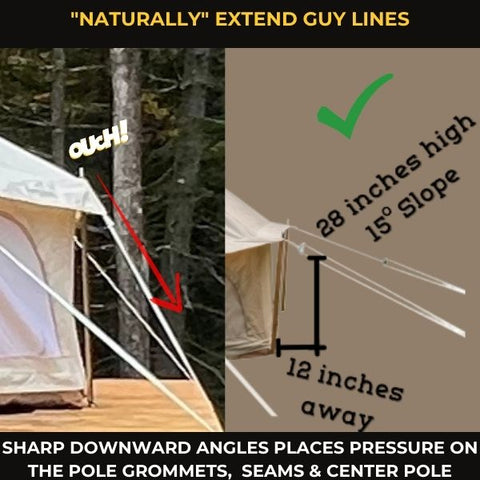
For the guy line rope that is attached to the door, you could install a taller post, or add a second guy line above the door and tie each off to the posts directly to the left and right of the door.
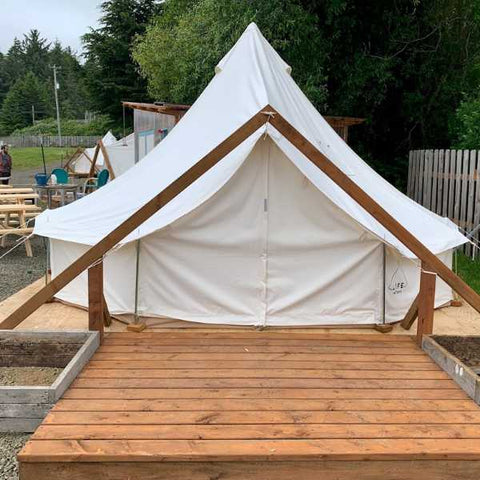
Some great plans are available to download for a reasonable price by our friends at Hazy Woods Design. Below is a small example of some plans that are available for purchase and instant download:
Alternatives to a Glamping Tent Platform
If you can’t afford to physically build-out a tent platform, or would like a quick protective ground barrier, then you could create a flat rock bed to erect your bell tent on top of. We’d suggest using finely ground rock such as decomposed granite or ¼ minus gravel. Frame it in with edging that is about 2 feet off the outside walls of the tent. Then lay down about 1.5”-2” of the material, periodically packing the rock down with every 0.5” layer. This option could be done affordably, with only between $300-$600 worth of material.
Also, adding river rock around the perimeter of your tent will help to prevent water from dripping off your tent and having mid splash up onto the canvas.


